How to Track Offline Conversions with Google
Spotted in early February, a beta test from Google called Enhanced Conversions will let you follow your prospects’ movements and track conversions more effectively offline without having to mess around with your CRM.
The new option offers an alternative to the existing Google Click ID-based offline conversion tracking method. It’s likely to make tracking offline conversions a lot easier, since it can be configured from your Google Ads account (instead of your CRM).
Not only that, but by using this data, Google’s systems may be able to make better auction decisions, which could mean more cost-efficient campaigns and better conversions.
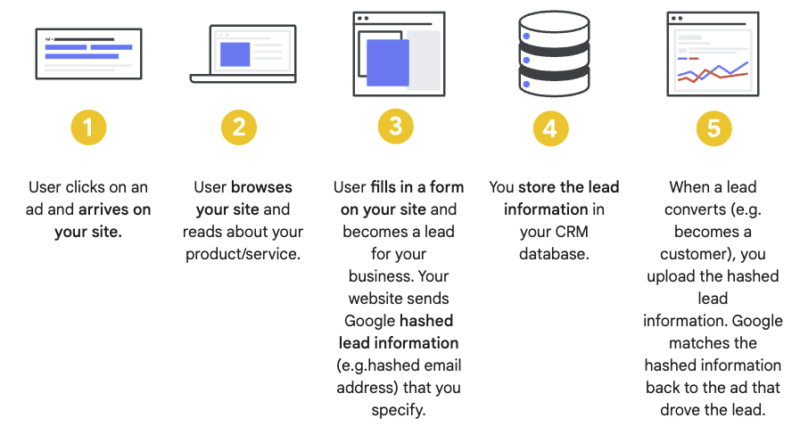
Here’s how it works, according to Google:

So as you can see, when a lead fills out your opt-in form, you’ll probably receive first-party data such as their email address, name and/or phone number. That data can be captured in your conversion tracking tags, “hashed” and then sent to Google.
(“Hashing” of course meaning a fully safe and private way of encrypting data.)
When a lead converts, you upload that lead’s hashed information, and Google matches that information to the ad that drove the lead. This gives the platform – and you – a more complete picture of the customer’s full journey.
The problem with the old method
The good ol’ Google Click ID-based offline conversion tracking method still works – don’t worry. But with Enhanced Conversions, you can control the offline conversion data you have more easily.
Since Enhanced Conversions with Leads uses information about your leads that you’ve already captured (i.e., email addresses), it doesn’t require you to modify your CRM systems, making this way more convenient for many advertisers.
How to set it up
Enhanced Conversions for Leads can be configured via Google Tag Manager so long as you have Google Ads conversion tracking set up and auto-tagging is enabled.
Alternatively, it can also be configured using the global site tag directly on your page if you already have conversion tracking implemented this way.
How to use Google Tag Manager with Convertri
Want to get started using Google Tag Manager with your Convertri pages and take advantage of Enhanced Conversions? Here’s how.
Video walkthrough:
1. Go to the funnel you wish to add to the tag to. On the left-hand side of the funnel, you will see ‘Scripts’. We will be adding in scripts from Google Tag Manager into here.
2. In a different tab, create an account with Google Tag Manager. When you log in, you will be shown something which looks like this:
 3. You want to click the blue ‘Create Account’ button.
4. You will see the screen below:

5. Name your account something memorable like ‘Convertri’.
6. In the container name box, enter the domain your funnel is published to e.g. test.convertri.com
7. The target platform is the first option ‘ Web’. Then click Create.
8. The user service agreement will appear which you can read and when you are happy with it, tick the box and the button and select ‘Yes’ from the top right-hand corner.
9. A box will appear which reads ‘ Install Google Tag Manager’. This contains the code which needs to be added as scripts in your Convertri funnel.
10. The first piece of code is for the head and the second is for the body. Copy the first code to clipboard and go back to Convertri.
11. Click ‘ Add Funnel Script’ and name the script something memorable. Set the Script Position to Head and then paste in the code in the bottom box and click Save.
12. Go back to Google Tag Manager and copy the second piece of code to clipboard and go back to Convertri.
13. Click ‘ Add Funnel Script’ and name the script something memorable. Set the Script Position to Body and then paste in the code in the bottom box and click Save.
14. You have now added both of your Tag Manager codes to Convertri and you are set up.
You are now able to enter code and scripts directly to Tag Manager and not have to republish your pages in Convertri.


